Showing posts with label SFDC. Show all posts

Sunday, December 27, 2015

Self recurring class to create test records in Salesforse object

While working on Round Robin Incidents Assignment Routine for BMC Remedyforce we've built a tool to auto create test Incident records. This tool creates new record every one minute simulating real environment.

After minor modifications the same solution could be used for similar purposes to simulate creating records in standard or custom from SFDC UI. Below we provided example of self recurring class to create test Contact records.

The code has comments however please feel free to Contact Us if you have any questions.

APEX Class: AutoContactsCreator
/*
Version      : 1.0
Company      : WebSolo inc.
Date         : 12.2015
Description  : APEX class to automatically create new test Contact record (with some test data) each 5 minutes
History      :             
*/
global class AutoContactsCreator implements Schedulable{
 //Execute method
    global void execute(SchedulableContext SC) {
        //Code to check if test Account with name 'Test Account' exists and to create one if not.
        List acc = [SELECT id FROM Account WHERE Name = 'Test Account' limit 1];
        if(acc.size() == 0){
            Account NewAcc = new Account();
            NewAcc.Name = 'Test Account';
            insert NewAcc;
            acc.add(NewAcc);
        }
        //Code to check if test Contacts (created before with name AutoContact) exist and to identify the most recent Name (to auto increase name for new one).
        Contact con = new Contact();
        con.AccountId = acc[0].id;
        //Get next number of autocontact
            //Get last AutoContact record and parce LastName value
             List lastCon = [SELECT Name FROM Contact WHERE LastName LIKE 'AutoContact%' ORDER BY CreatedDate DESC LIMIT 1];
             //If exist, substring most recent name OR start form 1
             Integer NumOfNextAutoCon;
             if(lastCon.size() != 0){
                 String nameOfLastAutoCon = lastCon[0].Name;
                 NumOfNextAutoCon = Integer.valueOf(nameOfLastAutoCon.substringAfter('AutoContact')) + 1;
             }
             else{
                NumOfNextAutoCon = 1;
             }
        //Prepare values for First/Last Name, Phone, Email     
        con.FirstName = 'Test';
        con.LastName = 'AutoContact' + NumOfNextAutoCon;
            //Generate random number for phone from 1000000 to 9999999
            Integer uniqueVal =  Math.round(Math.random()*1000000) + 999999 ;
        con.Phone = '416' + uniqueVal;
        con.Email = 'AutoContact' + NumOfNextAutoCon + '@TestAccount.com';
        insert con;
        
        //This code section will schedule next class execution in 5 minutes from now
        datetime nextScheduleTime = system.now().addMinutes(1);
        string minute = string.valueof(nextScheduleTime.minute());
        string second = string.valueof(nextScheduleTime.second ());
        string cronvalue = second+' '+minute+' * * * ?';
        string jobName = 'AutoContactsCreator ' + nextScheduleTime.format('hh:mm');
        AutoContactsCreator p = new AutoContactsCreator();
        system.schedule(jobName, cronvalue , p);
 
        //This code section to be used to abort auto-scheduled job
        system.abortJob(sc.getTriggerId());
    }
    //Method to start shedule job form console
    public void startJob(){
        datetime nextScheduleTime = system.now().addMinutes(1);
        string minute = string.valueof(nextScheduleTime.minute());
        string second = string.valueof(nextScheduleTime.second ());
        string cronvalue = second+' '+minute+' * * * ?' ;
        string jobName = 'AutoContactsCreator ' + nextScheduleTime.format('hh:mm');   
        AutoContactsCreator p = new AutoContactsCreator();
        system.schedule(jobName, cronvalue , p);    
    }
    //Method to abort shedule job (with 'AutoContactsCreator' name) form console
    public void deleteJob(){
        CronTrigger job = [SELECT Id, CronJobDetail.Id, CronJobDetail.Name, CronJobDetail.JobType FROM CronTrigger where CronJobDetail.Name LIKE 'AutoContactsCreator%'];
        system.abortJob(job.Id);
    }
 }

APEX Class: AutoContactsCreator_TESTclass
/*
Version      : 1.0
Company      : WebSolo inc.
Date         : 12.2015
Description  : APEX test coverage class for AutoContactsCreator class
History      :             
*/
@isTest
private class AutoContactsCreator_TESTclass {
    static testMethod void myUnitTest() {
        AutoContactsCreator autoCrCon = new AutoContactsCreator();
        autoCrCon.StartJob();
        autoCrCon.deleteJob();
        system.schedule('Test', '0 0 * * * ?' , autoCrCon);
    } 
}

SFDC Developer Console commands to use with AutoContactsCreator class

To execute self recurring class
AutoContactsCreator autoCrCon = new AutoContactsCreator();
autoCrCon.StartJob();

To abort self recurring class
AutoContactsCreator autoCrCon = new AutoContactsCreator();
autoCrCon.deleteJob();
Note: You also can abort the job manually here Setup -> Jobs -> Scheduled Jobs

Helpful command to DELETE all previously created by self recurring class test records
DELETE [SELECT id FROM Contact WHERE LastName LIKE 'AutoContact%'];

Thursday, May 14, 2015

Let your Contacts update their Email preferences using Force.com Site without authentication. Configuring the public Force.com Site.

Force.com Sites is relatively known feature which allows SFDC developers to set up public-facing sites/pages hosted by Salesforce platform. Using Force.com Site you can build micro web sites with one landing page or complicated sites with multiple pages. Such sites could have complicated flows to expose/collect information from/to Salesfroce. Advanced Force.com sites could even (for instance) accept credit card payments.

In this post we will show how to built quite easy but useful Force.com site and page with a purpose to let your Salesforce Contacts update their Email preferences themself, without contacting your support team. I.e. unsubscribe by updating Email Opt Out checkbox in related Salesforce record.

Solution could be modified based on particular business requirements.
Please do not hesitate to contact us if you want to leverage this solutions in your Saleforce instance.

Here's how the solution flow works:
  1. SFDC (or mass mail application) sends marketing emails out to customers (SFDC Contacts).
  2. Email will consist of "manage my subscription" or "unsubscribe" link. The link will be unique for each Contact and consist of "encrypted" Contact's ID. Encrypting is recommended to hide real SFDC Contatc ID (15-character) for security reasons. See the link with “hash id” (in yellow) below as an example.
  3. End user clicks on that URL and opens a Force.com site page, change his Email preferences and click "Update"to commit updates to SFDC.
Unique URL in email for end customer will looks like this:
http://yourdomain.force.com/emailpreferences/profile/fd90b5cd3bda11119f79a0c8131ab2ac7266d3f54add67f276c396e74f906da4

Step 0: Create new trigger to populate HashId field on Contact object

As mentioned above we suggest to encrypt native SFDC ID to improve your Force.com site security.
This technique allows to hide and not publicly expose your SFDC Contact record's ID. Instead of this Force.com site will use Crypto generated (algorithm SHA256) compact representations of the original ID value which will be "decrypted" back by URL rewriter controller class (see below).

First please create new HashId [HashId__c, Text (255)] field on Contact object. To make the field indexed by SFDC (and improve Force.com site response time) set External ID check box to TRUE.
Then create ContactHashId trigger to populate the field with encrypted value. 

NOTE: Trigger fires on "after insert", "before update" events on Contact object. Please make sure you will "update" existing Contacts using APEX scheduled Job or DataLoader.


APEX trigger: ContactHashId
/*
Version      : 1.0
Company      : WebSolo inc.
Date         : 05.2015
Description  : trigger to populate the HashId field on Contact object (used by PublicEmailPreferencesURLRewriter class)
History      :             
*/

trigger ContactHashId on Contact (after insert, before update) {

    // Generate hash ids for all contacts that don't have them.
    List<Contact> contactsToUpdate = new List<Contact>();
    for (Contact c : Trigger.new) {
        if (c.HashId__c == null) {
            String hashId = EncodingUtil.convertToHex(Crypto.generateDigest('SHA-256', Blob.valueOf((String)c.Id)));
            if (Trigger.isInsert) {
                contactsToUpdate.add(new Contact(Id = c.Id, HashId__c = hashId));
            } else {
                c.HashId__c = hashId;
            }
        }
    }
    if (!contactsToUpdate.isEmpty()) {
        update contactsToUpdate;
    }
}

Step 1: Set up Unique Domain Name for your SFDC instance

You can set up your Force.com Site by going to Setup | Develop | Sites

If your company does not have Force.com Site yet, you will be able to register a Force.com domain name that you like (upon availability).

NOTE: Be careful when registering the domain name on your Production instance. After registration you will not be able to change it! As per Salesforce "You cannot modify your Force.com domain name after the registration process."

Step 2: Create Force.com site components (VF page, APEX controllers, template) 

Create and save following Force.com site components.

VF page (Active Site Home Page): PublicEmailPreferences
<!-- 
Version      : 1.0
Company      : WebSolo Inc.
Date         : 05.2015
Description  : VF page "PublicEmailPreferences" to serve as a page in Force.com site
History      :             
-->

<apex:page controller="PublicEmailPreferencesController" cache="false" expires="0" showHeader="false" sidebar="false">

<style>
body { font-size: 100%; }
.contactInfo { margin: 20px 0px; }
.contentPanel { float: left; margin: 5px 0px 20px 20px; }
.contactLabel { float: left; font-weight: bold; width: 10em; }
h1 { color: #cc6611; font-size: 200%; padding-top: 25px;}
input[type="checkbox"] { height: 20px; width: 20px; }
.detailPanel { float: left; margin-left: 10px; width: 16em;margin-top:10px }
.logo { margin: 0px 100px 0px 20px; width: 250px; }
.selectionLabelPanel { float: left; margin-bottom: 10px; }
.selectionLabel { font-weight: bold; }
.selectionCheckboxPanel { float: right; }
</style>

<apex:composition template="{!$Site.Template}">
<apex:define name="logo">
<!-- 
You can add the logo here as a link to static resource 
<apex:image styleClass="logo" value="{!$Resource.LOGO_RESOURCE_NAME}" />
-->
</apex:define>

<apex:define name="headline">
  <h1>Email Opt Out Preferences</h1>
</apex:define>

<apex:define name="body">

  <apex:form >
  <apex:outputPanel id="leftPanel" layout="block" rendered="{!showPrefs}" styleClass="contentPanel" >    
    <apex:outputPanel layout="block" >
      <apex:outputText value="Keep your email preferences up to date." />
    </apex:outputPanel>    
    <apex:outputPanel layout="block" styleClass="contactInfo" >
      <apex:outputPanel layout="block" styleClass="contactLabel" >
        <apex:outputText value="Email" />
      </apex:outputPanel>
      <apex:outputPanel layout="block" >
        <apex:outputText value="{!contact.Email}" />
      </apex:outputPanel>
      <apex:outputPanel layout="block" styleClass="clearBoth" />
    </apex:outputPanel>    
    <apex:outputPanel layout="block" styleClass="contactInfo" >
      <apex:outputPanel layout="block" styleClass="contactLabel" >
        <apex:outputText value="First Name" />
      </apex:outputPanel>
      <apex:outputPanel layout="block" >
        <apex:outputText value="{!contact.FirstName}" />
      </apex:outputPanel>
      <apex:outputPanel layout="block" styleClass="clearBoth" />
    </apex:outputPanel>    
    <apex:outputPanel layout="block" styleClass="contactInfo" >
      <apex:outputPanel layout="block" styleClass="contactLabel" >
        <apex:outputText value="Last Name" />
      </apex:outputPanel>
      <apex:outputPanel layout="block" >
        <apex:outputText value="{!contact.LastName}" />
      </apex:outputPanel>
      <apex:outputPanel layout="block" styleClass="clearBoth" />
    </apex:outputPanel>    
    <apex:outputPanel layout="block" styleClass="contactInfo" >
      <apex:outputPanel layout="block" styleClass="clearBoth" />
    </apex:outputPanel>    
    <apex:outputPanel layout="block" >
      <apex:outputText value="To request an update to your profile information, please kindly contact our " />
      <apex:outputLink target="_top" style="color:#cc6611" value="mailto:SUPPORT%40YOURCOMAPNYDOMAIN.com?subject=Please%20update%20my%20information">support team</apex:outputLink>
      <apex:outputText value="." />
    </apex:outputPanel>    
  </apex:outputPanel>
  
  <apex:outputPanel layout="block" styleClass="clearBoth" />
  
  <apex:outputPanel id="rightPanel" layout="block" rendered="{!showPrefs}" styleClass="contentPanel" >    
    <apex:outputPanel layout="block" >
      <apex:outputText value="Select the checkbox if you do not want to receive emaild form us." />     
    </apex:outputPanel>
    <apex:outputPanel layout="block" styleClass="detailPanel" >    
      <apex:outputPanel layout="block" styleClass="selectionPanel" >
        <apex:outputPanel layout="block" styleClass="selectionLabelPanel" >
          <apex:outputText styleClass="selectionLabel" value="Opt Out Of Emails" />
        </apex:outputPanel>
        <apex:outputPanel layout="block" styleClass="selectionCheckboxPanel" >
          <apex:inputCheckbox styleClass="selectionCheckbox" value="{!subEmailOptOut}" />
        </apex:outputPanel>
      </apex:outputPanel>        
    </apex:outputPanel>
    <apex:outputPanel layout="block" styleClass="clearBoth" />
    <apex:outputPanel id="buttonPanel" layout="block" >
      <apex:actionStatus id="saveStatus">
        <apex:facet name="start">
            <apex:outputPanel >
            Updating...&nbsp;<img src="{!$Resource.AnimatedBusy}" />
          </apex:outputPanel>
        </apex:facet>
        <apex:facet name="stop">
          <apex:commandButton action="{!updatePreferences}" rerender="messagesPanel" status="saveStatus" style="background: #cc6611; color: white; font-size: 200%; margin-top: 20px;" styleClass="updateBtn" value="Update" />
        </apex:facet>
      </apex:actionStatus>
    </apex:outputPanel>    
  </apex:outputPanel>

  <apex:outputPanel layout="block" styleClass="clearBoth" />

  <apex:outputPanel id="messagesPanel" layout="block" style="max-width: 400px;" >
    <apex:outputPanel layout="block" rendered="{!hasMessages}" style="{!messagePanelStyle}" >
      <apex:repeat value="{!messages}" var="message">
        <apex:outputText value="{!message}" />
      </apex:repeat>
    </apex:outputPanel>
  </apex:outputPanel>

  </apex:form>

</apex:define>

</apex:composition>

</apex:page>

NOTE: For $Resource.AnimatedBusy please use any animated GIF illustrate "progress"

VF page controller (for Active Site Home Page): PublicEmailPreferencesController
/*
Version        : 1.0
Company        : WebSolo Inc.
Date           : 05.2015
Description    : controller for PublicEmailPreferences VF page 
Update History :

*/ 

public without sharing class PublicEmailPreferencesController {

    public Contact contact { public get; private set; }
    public Boolean subEmailOptOut { public get; public set; }
    public String rsaEmail { public get; private set; }
    public String rsrEmail { public get; private set; }
    public List<String> messages { public get; private set; }
    public Boolean hasMessages { public get {return messages != null && !messages.isEmpty();} private set; }
    public String messagePanelStyle { public get {return hasErrorMessage ? ERROR_STYLE : INFO_STYLE;} private set; }
    public Boolean showPrefs { public get; private set; }
    
    private Boolean hasErrorMessage = false;
    
    public final static String URL_PARM_ID = 'id';
    public final static String INFO_STYLE = 'color: green; background-color: #efe; padding: 10px; margin: 10px; border: 1px solid green;';
    public final static String ERROR_STYLE = 'color: red; background-color: #fee; padding: 10px; margin: 10px; border: 1px solid red;';
    public final static String ERR_CONTACT_NOT_FOUND = 'We are unable to retrieve your information at this time.';
    public final static String ERR_PREFS_UPDATE_FAILED = 'We are unable to update your preferences at this time.';
    public final static String ERR_PREFS_UPDATE_SUCCEEDED = 'Your preferences have been updated.';
    
    public PublicEmailPreferencesController() {
        
        clearMessages();
        
        String contactId = ApexPages.currentPage().getParameters().get(URL_PARM_ID);
        System.debug('id=' + contactId);
        if (contactId != null) {
            try {
                contact = getContactForId(contactId);
                if (contact != null) {
                    subEmailOptOut = contact.HasOptedOutOfEmail;
                    showPrefs = true;
                }
            } catch (Exception e) {
                addErrorMessage(ERR_CONTACT_NOT_FOUND);
            }
        } else {
            addErrorMessage(ERR_CONTACT_NOT_FOUND);
        }
    }
    
    private void addErrorMessage(String message) {
        if (messages == null) messages = new List<String>();
        messages.add(message);
        hasErrorMessage = true;
    }
    
    private void addInfoMessage(String message) {
        if (messages == null) messages = new List<String>();
        messages.add(message);
    }
    
    private void clearMessages() {
        if (messages == null) messages = new List<String>();
        messages.clear();
        hasErrorMessage = false;
    }
    
    private Contact getContactForId(String contactId) {
        Contact contact = null;
        List<Contact> contacts = [SELECT HasOptedOutOfEmail, Email, FirstName, Id, LastName FROM Contact WHERE Id = :contactId];
        if (contacts.size() == 1) {
            contact = contacts[0];
            
        } else {
            addErrorMessage(ERR_CONTACT_NOT_FOUND);
        }
        return contact;
    }
    
    public PageReference updatePreferences() {
        try {
            clearMessages();
            contact.HasOptedOutOfEmail = subEmailOptOut;
            update contact;
            addInfoMessage(ERR_PREFS_UPDATE_SUCCEEDED);
        } catch (Exception e) {
            addErrorMessage(ERR_PREFS_UPDATE_FAILED);
        }
        return null;
    }
}


VF page (template for site VF pages): PublicSiteTemplate
<!-- 
Version      : 1.0
Company      : WebSolo Inc.
Date         : 05.2015
Description  : VF page "PublicSiteTemplate" to serve as a Force.com Site Template
History      :             
-->
<apex:page showHeader="false" sidebar="false" id="PublicSiteTemplate" cache="false" expires="0" >
    <head>
        <title>FPC</title>
        
        <style>
            #fullContainer { }
            #headerContainer { padding: 0px 10px; }
            #logoContainer { float: left; }
            #contentContainer { padding-left: 10px; }
            #headlineContainer { float: left; margin-top:10px}
            #footerContainer { padding-left: 10px; }
            #footerbar { background-color: #cc6611; line-height: 0.5em; max-width: 650px; }
            .clearBoth { clear: both; }
        </style>
    </head>
    <body>
        <div id="fullContainer">
            <div id="headerContainer">
                <div id="logoContainer">
                    <apex:insert name="logo"/>
                </div>
                <div id="headlineContainer">
                    <apex:insert name="headline"/>
                </div>
                <div class="clearBoth"></div>
            </div>
            <div id="contentContainer">
                <div id="mainContent">
                    <apex:insert name="body"/>
                </div>
                <div class="clearBoth"></div>
            </div>
            <div id="footerContainer">
                <div id="footerLinks"></div>
                <div class="clearBoth"></div>
                <div id="footerbar">&nbsp;</div>
                <div class="clearBoth"></div>
            </div>
        </div>
    </body>
</apex:page>


APEX class (URL rewriter): PublicEmailPreferencesURLRewriter
/*
Version      : 1.0
Company      : WebSolo inc.
Date         : 05.2015
Description  : controller to support URL Rewrite for Force.com VF page "PublicEmailPreferences"
History      :             
*/

global class PublicEmailPreferencesURLRewriter implements Site.UrlRewriter {
    public static final String EMAIL_PROFILE_FRIENDLY = '/profile/';
    public static final String EMAIL_PROFILE_VF_PAGE_BASE = '/PublicEmailPreferences';
    public static final String EMAIL_PROFILE_VF_PAGE = EMAIL_PROFILE_VF_PAGE_BASE + '?' + PublicEmailPreferencesController.URL_PARM_ID + '=';

    global PageReference[] generateUrlFor(PageReference[] urls) {
        
        System.debug('generateUrlFor has been invoked for ' + urls);
        PageReference[] pageRefs = new List<PageReference>();
        
        Set<Id> cIds = new Set<Id>();
        for (PageReference pRef : urls) {
            String urlStr = pRef.getUrl();
            if (urlStr.startsWith(EMAIL_PROFILE_VF_PAGE_BASE)) {
                cIds.add(urlStr.substring(EMAIL_PROFILE_VF_PAGE.length()));
            }
        }
        
        Map<Id, Contact> contactsById = new Map<Id, Contact>([SELECT Id, HashId__c FROM Contact WHERE Id IN :cIds]);
        for (PageReference pRef : urls) {
            String urlStr = pRef.getUrl();
            pageRefs.add(
                urlStr.startsWith(EMAIL_PROFILE_VF_PAGE_BASE) ?
                new PageReference(EMAIL_PROFILE_FRIENDLY + contactsById.get(urlStr.substring(EMAIL_PROFILE_VF_PAGE.length())).HashId__c) :
                pRef
            );
        }
         return pageRefs;
    }
    
    global PageReference mapRequestUrl(PageReference url) {
        
        PageReference pageRef = null;
        
        String urlStr = url.getUrl();
        System.debug('mapping url=' + urlStr);
        
        if (urlStr.startsWith(EMAIL_PROFILE_FRIENDLY)) {
            String hashId = urlStr.substring(EMAIL_PROFILE_FRIENDLY.length());
            if (hashId != '') {
                List<Contact> contacts = [SELECT Id FROM Contact WHERE HashId__c = :hashId];
                if (!contacts.isEmpty()) {
                    pageRef = new PageReference(EMAIL_PROFILE_VF_PAGE + contacts[0].Id);
                } else {
                    pageRef = new PageReference(EMAIL_PROFILE_VF_PAGE);
                }
            }
        }
        return pageRef; 
    }
}


Step 3: Configuring new Force.com Public Site

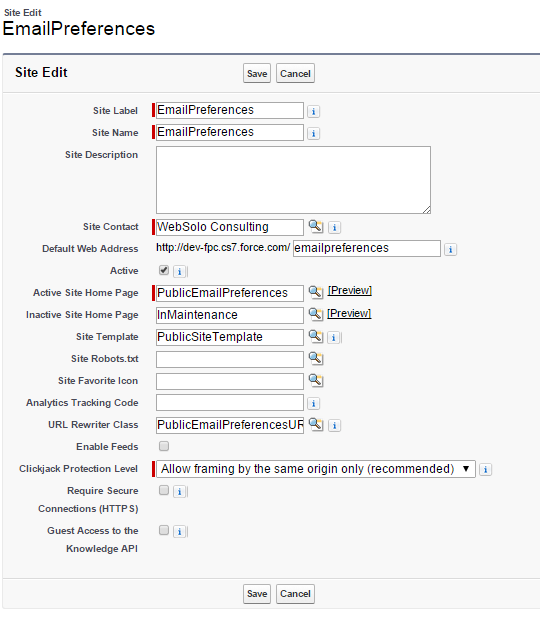
Press the "New" button to create a new Force.com Site and enter the following values – you can leave all the other fields as-is. Click Save when done.
    • Site Label – name (may contain spaces) used to identify the site in the Salesforce user interface. In this example we use EmailPreferences. See screenshot below.
    • Site Name – name (cannot contain spaces) used to identify the site in code
    • Site Contact – Salesforce user who will receive email notifications about any problems with the site.
    • Default Web Address – the part of the site URL that will appear immediately after the domain name, e.g. “domainname.force.com/defaultwebaddress”.
    • Active – makes the site available for use. Can be set manually, or the Activate and Deactivate buttons on the Site page can be used to change tise setting.
    • Active Site Home Page – name of the Visualforce page that serves as the home page of the site when it is active: PublicEmailPreferences.
    • Inactive Site Home Page – name of the Visualforce page that serves as the home page of the site when it is not active: InMaintenance (automatically generated by Salesforce).
    • Site Template – name of the template that specifies the structure of all site pages: PublicSiteTemplate.
    • URL Rewriter Class – name of the class that translates public-facing URLs to internal ones: PublicEmailPreferencesURLRewriter. This class converts the public-facing contact ids into Salesforce record ids, so it provides one level of data security.
    • Clickjack Protection Level – the recommended value is compatible with the operation of the site.
Configuring new Force.com Public Site


Step 4: Adjusting Site Profile Permissions

Please proceed up with following steps:
    • On the Site Details page, click Public Access Settings.
    • Click Object Settings select Contact object and click Edit.
    • For Email Opt Out field tick Read and Edit 
    • Click Save.
    • Return to Profile Overview page select Visualforce Page Access and click Edit.
    • On the Enabled Visualforce Page list, select following pages and click Save:
      • PublicEmailPreferences
      • PublicEmailTemplate
    • Return to Profile Overview page select Apex Class Access and click Edit.
    • On the Enabled Apex Classes list, select following classes and click Save:
      • PublicEmailPreferencesController 
      • PublicEmailPreferencesURLRewriter
    • Note that the Enabled Visualforce Pages list may (and should) automatically include default pages associated with the site.
Step 5:  Test your new Force.com Site

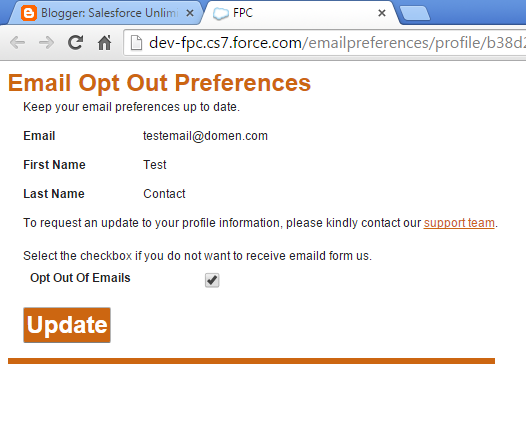
When all done you can open the Force.com site URL an test it in action.
See how it suppose to looks like on our screenshot.


Force.com Site

Monday, July 14, 2014

Custom Validation For Lead Conversion

To increase data quality Sales Managers encourage their Sales Representatives to gather as much as possible information about Leads before Conversion it to Contact, Account and Opportunity.

There are multiple techniques to enforce SFDC Users to enter values to all required fields before the Conversion. Let's discuss these techniques with implementation details and all its PROS and CONS.

How to enforce Sales Reps to enter values to required Lead fields before the Conversion.


#1 Make fields required on Lead layout

The most obvious and straight forward solution. But not the best one. Salesforce Lead layout allows Administrator to make some fields required (mandatory). But it's hard for Sales representative to get values for all required fields at once. In most cases Sales person can enter some data initially and then revisit the Lead record to update the rest of the important fields later.

PROS: Easy to implement
CONS: Not convenient for Users. To make any update (edit the Lead) User have to enter values in all required fields at once.

#2 Use a validation rule to fire when Lead is actually converted

Such validation rule will help to make certain fields required before converting the Lead but not require them to be entered when User edits the Lead's record.

Here is example of Validation Rule (could be adjusted to meet particular business requirements)

Rule Name:  Lead_Conversion_Validation

Error Condition Formula:
AND(IsConverted,
OR(
ISBLANK(Email),
ISBLANK(Phone),
ISBLANK(Website),
ISBLANK(TEXT(LeadSource)),
ISBLANK(TEXT(Range_of_Revenues__c)),
ISBLANK(State),
ISBLANK(Street),
ISBLANK(City),
ISBLANK(PostalCode),
ISBLANK(Country)
))

Error Message:
Please fill out following fields before conversion:
- Email
- Phone
- Full Address
- Website
- Range of Revenues
- Lead Source

PROS: Pretty easy to implement
CONS: Still not convenient for Users. The Validation Rule fires ONLY when user hit the Convert button on the Lead page, entered data on Conversion page and clicked Convert button. If something goes wrong (any required field is missed) - user will lose his time and will have to return back to the Lead page to enter missed data. Also Error Message is very general and does not really help the User to identify the missed field(s).

#3 Use workflow to update the Lead's Record Type/Layout when User enters all required for conversion fields

To build this solution you will have to create and support two Lead Record Types and related identical Lead layouts:
 - NotReadyForConversion (default) Lead Record Type and related Lead layout without Convert button
 - ReadyForConversion Record Type and related Lead layout with Convert button

Custom workflow have to check/monitor if all required fields have data.
When the necessary fields are filled out workflow action will update the Lead's Record Type to ReadyForConversion and Users will see the Lead in new layout - with Convert button.

PROS: Allows user to edit the Lead and Convert it only when all required fields are filled out.
CONS: Required two Record Type and two Layouts. Difficult to maintain - especially if you have multiple Leads Record Types/Layouts/User Profiles. Still not convenient for Users. No Error message. User can't see/check out which fields are still missing.

#4 Override the standard 'Convert' button with custom button and related VF page/Controller

SFDC Administrator/Developer can create a new custom 'Convert' button to be used on Lead layout instead of native one. Click to the button will call popup window with custom VF page and Controller to check if all required fields have data (based on particular business requirements).
  • If all required fields are filled out - embedded in VF page JavaScript will auto close the pop up window and redirect User to Conversion page.
  • If any required field(s) not filled out yet - VF page will show User Error message with information about which field(s) have to be entered. By click to Close button / or lose pop up window focus / or in 10 seconds of inactivity - close/auto close pop up window. User still on the Lead page and can enter data in missed field.
PROS: Allows user to edit the Lead and Convert it only when all required fields are filled out. User can easy check out which fields are missing to let them to convert the Lead.
CONS: Required some Force.com development. But final result worth the efforts - Sales Users are happy with the solution which help then save time and meet data quality criteria.

Solution Code Sample: (please contact us if you have questions or want to modify this solution to meet your particular business requirements)

Custom Button

Label: Convert
Object Name: Lead
Name: ConvertCustom
Behavior: Execute JavaScript
Display Type: Detail Page Button
OnClick JavaScript

var url = "/apex/Lead_Conversion_Validation?id={!Lead.Id}";
var width = "350";
var height = "350";
window.open(url, '','scrollbars=no,resizable=no,status=no,toolbar=no,menubar=no, width=' + width + ',height=' + height + ',left=' + ((window.innerWidth - width)/2) + ',top=' + ((window.innerHeight - height)/2) );

Visualforce Page: Lead_Conversion_Validation
<!--
Version        : 1.0
Company        : Websolo Inc. (websolo.ca)
Date           : 07/2014
Update History :
-->
<apex:page standardController="Lead" showHeader="false" sidebar="false" extensions="LeadConversionValidation">
<style>
h2
{
  width: 300% !important;
}
</style>
   <script>
window.onload = function(){
window.onblur = function(){window.close();}
     if(document.getElementById('sd').innerHTML == "")
     {
      var ids = document.getElementById('ids').innerHTML;
      window.opener.location.href="/lead/leadconvert.jsp?retURL=%2F" + ids + "&id=" + ids;
      window.top.close();
     }
     else
     {
         setTimeout(function(){
          window.close();
        }, 10000);   
     }
};
   </script>
      <div id="sd" style="display: none;">{!reft}</div>
      <div id="ids" style="display: none;">{!leadobjid}</div> 
 <apex:pageBlock title="Lead Conversion Validation">
      <apex:pageBlockButtons location="bottom">
       <button onclick="window.close();">Close</button>
     </apex:pageBlockButtons>
      <apex:pageMessage severity="error" strength="1">
          <apex:outputText value="{!error}" escape="false" />
          <apex:outputText value="{!sterrmsg}" escape="false" rendered="{!sterr}"/><br />         
      </apex:pageMessage>
  </apex:pageBlock>
</apex:page>


Apex Class: LeadConversionValidation
(controller - code could be adjusted to meet particular business requirements)
/*
Version        : 1.0
Company        : Websolo Inc. (websolo.ca)
Date           : 07/2014
Update History :
*/
public class LeadConversionValidation
{
    public id leadobjid {get; set;}
    public String error {get; set;}
    public String reft {get; set;}
    public Boolean sterr {get; set;}
    public String sterrmsg {get; set;}
    public LeadConversionValidation(ApexPages.StandardController controller)
    {
      sterr = false;
      sterrmsg = 'To convert Lead please change Lead Status to Contacted';
      error = 'Please fill out following fields before conversion:<br />';
      reft = '';
      leadobjid = ((Lead) controller.getRecord()).id;
      Lead leadobj = [select Status, LastName, Keywords__c, Financing_Notes__c, Email,Phone,Website,Employees__c,Rapport__c,LeadSource,Range_of_Revenues__c,State,Street,City,PostalCode,Country from Lead where id =: leadobjid ];
      if(leadobj.LastName == null ||
        leadobj.Keywords__c  == null ||
        leadobj.Financing_Notes__c == null ||
        leadobj.Email == null ||
        leadobj.Phone == null ||
        leadobj.Website == null ||
        leadobj.Employees__c == null ||
        leadobj.Rapport__c == null ||
        leadobj.LeadSource == null ||
        leadobj.Range_of_Revenues__c == null ||
        leadobj.State == null ||
        leadobj.Street == null ||
        leadobj.City == null ||
        leadobj.PostalCode == null ||
        leadobj.Country == null)
        { 
          reft = '1';
          if(leadobj.Keywords__c  == null){error = error + '- Keywords<br />';}
          if(leadobj.Financing_Notes__c  == null){error = error + '- Call Notes (at least 100 characters)<br />';}
          if(leadobj.Email == null){error = error + '- Email<br />';}
          if(leadobj.Phone == null){error = error + '- Phone<br />';}
          if(leadobj.Website == null){error = error + '- Website<br />';}
          if(leadobj.Employees__c  == null){error = error + '- Employees Range<br />';}
          if(leadobj.Rapport__c == null){error = error + '- Rapport<br />';}
          if(leadobj.LeadSource == null){error = error + '- Lead Source<br />';}
          if(leadobj.LastName == null){error = error + '- Lead Name<br />';}
          if(leadobj.Range_of_Revenues__c == null){error = error + '- Range of Revenues<br />';}
          if(leadobj.State == null || leadobj.Street == null || leadobj.City == null || leadobj.PostalCode == null || leadobj.Country == null){error = error + '- Full Address<br />';}     
        }
        if(leadobj.Status != 'Contacted')
        {
          //sterr = true;
          if(reft == '1')
          {
           sterr = true;
          }
          else
          {
           error = '';
           reft = '1';
           sterr = true;
          }
        }         
    }
}


Apex Class: TestLeadConversionValidation (test coverage)
Version        : 1.0
Company        : Websolo Inc. (websolo.ca)
Date           : 07/2014
Update History :
*/
@isTest
private class TestLeadConversionValidation
{
static testMethod void myUnitTest() 
{
Lead ld = new Lead();
ld.LastName = 'test';
ld.Company = 'test';
ld.Email = 'test@test.com';
ld.Phone = '1112223456';
insert ld;
LeadConversionValidation obj = new LeadConversionValidation(new ApexPages.StandardController(ld));
}
}