Monday, August 22, 2016

Storage Usage issue - remove legacy and redundant Task records

Salesforce Orgs with long usage history (more than 3 years) and small Data Storage limits (~1GB) could suffer storage limit issues (> 100%).

In most cases Task object brings the issues with Data Storage overuse.

Unfortunately as per SFDC limitation there is no quick way to delete/remove Tasks created 2 years ago and backwards.

However there is a workaround using custom reports/data export and data loader. Please do not hesitate to contact us if you will need help to leverage this approach.

STEP 1: Export Data
Go to the Setup -> Data Management -> Data Export and click Export Now or Schedule Export button.


Tick Task then click Start Export.


As a result you will be able to download .zip file which contains .csv with tasks data.


STEP 2: Do clean up using Data Loader
Open as excel file and sort data by created date, leave id of tasks which needed to delete. Then use Data Loader to delete these tasks

Approach is a little bit time consuming but works.

Wednesday, July 13, 2016

Native fields in Lead mapping for conversion

For Leads conversion process Salesforce provides out-of-box functionality for mapping Lead fields to Account/Contact/Opportunity.

Unfortunately there is a limitations - you can't map native Leads fields to target object's native field. For instance you can't map value from LeadSource ("native" Lead field) to AccountSource ("native" Account field).

Here is one of the possible ways to workaround the limitation. Solution could be modified based on particular business requirements. Please do not hesitate to contact us if you want to leverage this solutions in your Saleforce instance.

STEP 1: Create custom Formula(Text) field for Lead object
Name: LeadSourceCustom
Formula:  TEXT(LeadSource)

STEP 2: Create custom Text(100) field for Account object
Name: AccountSourceCustom

STEP 3: Amend Lead fields mapping to write value from LeadSourceCustom to AccountSourceCustom.

STEP 4: Create simple Trigger on Account object
/*
    Version        : 1.0
    Company        : Websolo inc. 
    Date           : 07/2016
    Description    : 
    Update History : 
*/
trigger AccountSourceTrigger on Account (before update,before insert) {
    for(Account a: Trigger.new){
        if(a.AccountSourceCustom__c != null && a.AccountSourceCustom__c != '' && (a.AccountSource == null || a.AccountSource == '')){
            a.AccountSource = a.AccountSourceCustom__c;
        } 
    }
}

As a result this trigger will update native AccountSource field with value from "native" LeadSource field.

EXTRA NOTE:
We can't use WorkFlow as a workaround because AccountSource field is picklist and when we create workflow action to update this field we can write only specific value from the picklist.

Friday, April 1, 2016

Account Contact Roles on Contact layout

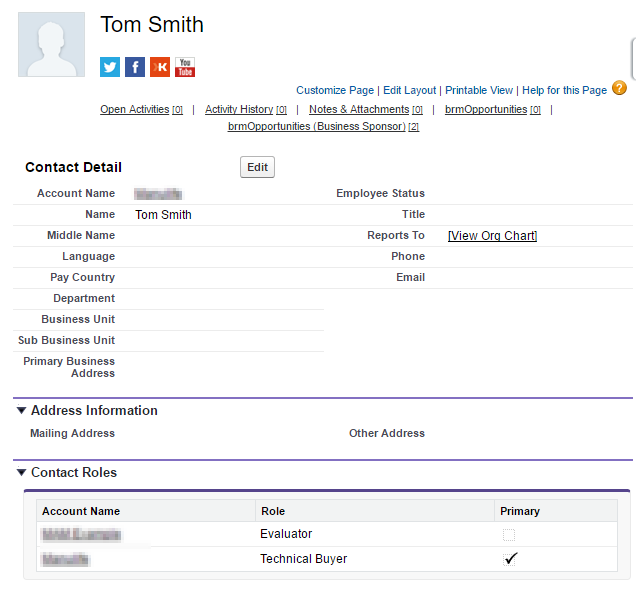
Salesforce has Contact Roles feature. Contact Role(s) could be applied for any Account and appear on Account layout as a related list. These Roles represent the role(s) that Contact(s) from the same or any other Account(s) plays in the Account. Such Roles could be also specified for Case, Contract, or Opportunity. When Contact roles defined, your team has more information to determine who to contact in particular circumstances.

Unfortunately Salesfroce does not provide any out-of-box tool to let User to see in which Account(s) the particular Contact involved. Means on Contact layout User can's see in which Account the Contact plays "Contact Role".

We want to share pretty easy solution to provide your Users such capability. Solution could be modified based on particular business requirements. Please do not hesitate to contact us if you want to leverage this solutions in your Salesforce instance.

STEP 1: Create VF page and APEX controller 

First you need to create custom Visualforce page which will display list of related to Contact Accounts and Contact Roles. Page's controller will consist of  SOQL SELECT related Account for current Contact. In our example we build Contact Roles for Account.

VF page:
ContactAccountsRolesDetails

<!-- 
Version      : 1.0
Company      : WebSolo Inc.
Date         : 03.2016
Description  : VF page "ContactAccountsRolesDetails" 
History      :             
-->
<apex:page standardController="Contact" extensions="ContactAccountsRolesDetailsContrExt" sidebar="false" showHeader="false" cache="false">
<style>
ul {
    margin-left: 0; 
    padding-left: 0;
}

li {
    list-style-type: none;
}    
</style>
    <apex:pageBlock >
        <apex:Messages />
        <apex:pageBlockTable value="{!listAccountContactRole}" var="acr" rendered="{!records}">
            <apex:column HeaderValue="Account Name">
                <!--<apex:outputText value="{!acr.Account.Name}"/>-->
                <a href="../{!acr.AccountId}" target="_parent"><apex:outputText value="{!acr.Account.Name}"/></a>
            </apex:column>
            <apex:column HeaderValue="Role">
                <apex:outputText value="{!acr.Role}"/>
            </apex:column>
            <apex:column HeaderValue="Primary">
                <apex:outputField value="{!acr.IsPrimary}"/>
            </apex:column>
        </apex:pageBlockTable>
        
    </apex:pageBlock>
</apex:page>


Controller:
ContactAccountsRolesDetailsContrExt


/*
    Version        : 1.0
    Company        : Websolo inc. 
    Date           : 03/2016
    Description    : 
    Update History : 
*/
public class ContactAccountsRolesDetailsContrExt
{ 
    public Id idContact;
    public Boolean records {get; set;}
    public List listAccountContactRole {get; set;}
    
    public ContactAccountsRolesDetailsContrExt(ApexPages.StandardController Controller) 
    {
        records = false;
        idContact = Controller.getRecord().id;
        listAccountContactRole = [SELECT id, AccountId, Account.Name, ContactId, Role, IsPrimary FROM AccountContactRole WHERE ContactId =: idContact];
        
        if (listAccountContactRole.size() != 0)
        {
            records = true;
        }
        else
        {
            Apexpages.Message noRecords = new Apexpages.Message(ApexPages.severity.INFO, 'No records to display');
            Apexpages.addMessage(noRecords);
        }
    }
}

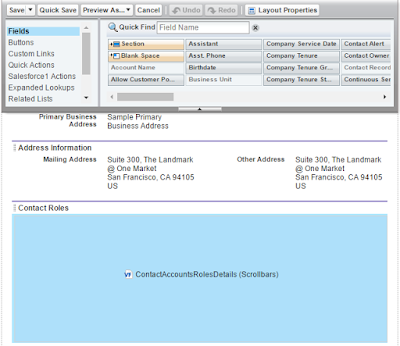
STEP 2: Add VF page to layout

When created VF page could be added to Contact Layout as in example below.


Friday, March 4, 2016

Disable and animate APEX command button after click to avoid double submission


There is wide known scenario when click to APEX command button on custom VF page would take quite long time to perform calculation on server side and return the result back to UI. User may try to click the button again which will result in unexpected and undesired consequences. Especially if click to the button invokes DML operations.

There are a few workarounds to avoid such scenarios. In this post you will the most popular workarounds with analysis about their PROS and CONS.

Solution could be modified based on particular business requirements. Please do not hesitate to contact us if you want to leverage any of this solutions in your Salesforce instance.

Notes related to all examples below:

  • As a $Resource.statusbar you can use any .gif animated "in progress" image
  • In all demos we used external controller to build mathematic curves to simulate server activity

#1 Disabling of APEX command button using jQuery. Replacing button with animated GIF

Disabling the button once the user clicks the button could be the straight forward solution. In this solution we will replace the button once the user clicks the button using jQuery

VF page:
DisableApexCommandBut
ton to demo disable Button
<!-- 
Version      : 1.0
Company      : WebSolo Inc.
Date         : 03.2016
Description  : VF page "DisableApexCommandButton" to demo disable Button
History      :             
-->

<apex:page sidebar="false" showheader="false" cache="false" expires="0" controller="DisableApexCommandButtonContr">
    <script src="https://ajax.googleapis.com/ajax/libs/jquery/1/jquery.min.js"></script>
    <apex:composition template="{!$Site.Template}">
    <apex:define name="body">
    <apex:form style="width:550px;" id="f1">
        <apex:outputPanel >
            <apex:commandButton style="margin-top:20px;margin-left:250px;margin-bottom:25px;height:30px;font-size:12px" styleClass="b1" value="Generate" status="status" action="{!run}" rerender="f1"/>
            <div style="display: none;   margin-left: 250px;"  class="statusbardiv">
                <apex:image width="70px" url="{!$Resource.statusbar}" />
            </div>
            <apex:selectRadio value="{!chart}">
                <apex:selectOptions value="{!items}"/>
            </apex:selectRadio><p/>
            <apex:actionStatus id="status" onstart="$('.statusbardiv').css('display','block');$('.b1').css('display','none');" onstop="$('.statusbardiv').css('display','none');$('.b1').css('display','block');" />    
            <div>
                <apex:chart height="300" width="500" data="{!data}">
                    <apex:legend position="top"/>
                    <apex:axis title="Y" type="Numeric" position="left" grid="true" fields="valY"/>
                    <apex:axis title="X" type="Numeric" position="bottom" fields="valX" />
                    <apex:lineSeries title="{!chart}" axis="left" xField="valX" yField="valY"/>
                </apex:chart>
            </div>  
        </apex:outputPanel>
    </apex:form>
    </apex:define>
    </apex:composition>
</apex:page>

PROS: Easy to implement. Looks good.
CONS:  Requires jQuery library.

#2 Call custom div as an overhead "modal window"

Another solution would be not try to "disable" buttons, but to call custom modal window which will prevent user from multiple clicks and multiple form submission.

VF page: DisableApexCommandButton
<!--
    Version        : 1.0
    Company        : Websolo inc. 
    Date           : 03/2015
    Description    : Call custom div as an overhead "modal window"
    Update History : 
-->
<apex:page sidebar="false" showheader="false" cache="false" expires="0" controller="DisableApexCommandButtonContr">
    <script src="https://ajax.googleapis.com/ajax/libs/jquery/1/jquery.min.js"></script>
    <style>
    .disabledbutton {
        pointer-events: none;
        opacity: 0.4;
        background-color:#E1E1E1;
    }
    </style>
    <apex:composition template="{!$Site.Template}">
    <apex:define name="body">
    <apex:form style="width:550px;" id="f1">
        <apex:actionStatus id="status" onstart="$('#mydiv').addClass('disabledbutton');$('.statusbardiv').css('display','block');" onstop="$('#mydiv').removeclass('disabledbutton');$('.statusbardiv').css('display','none');" />
        <div style="display: none; position: fixed; z-index: 999; margin-left: 250px; margin-top: 200px"  class="statusbardiv">
            <apex:image width="70px" url="{!$Resource.statusbar2}" />
        </div>
        <div id="mydiv">
            <apex:outputPanel >
                <apex:commandButton style="margin-top:20px;margin-left:250px;margin-bottom:25px;height:30px;font-size:12px" styleClass="b1" value="Generate" status="status" action="{!run}" rerender="f1"/>
                <apex:selectRadio value="{!chart}">
                    <apex:selectOptions value="{!items}"/>
                </apex:selectRadio><p/>    
                <div>
                    <apex:chart height="300" width="500" data="{!data}">
                        <apex:legend position="top"/>
                        <apex:axis title="Y" type="Numeric" position="left" grid="true" fields="valY"/>
                        <apex:axis title="X" type="Numeric" position="bottom" fields="valX" />
                        <apex:lineSeries title="{!chart}" axis="left" xField="valX" yField="valY"/>
                    </apex:chart>
                </div>  
            </apex:outputPanel>
        </div>
    </apex:form>
    </apex:define>
    </apex:composition>
</apex:page>

PROS: Works better in some cases
CONS: Not visually perfect for some users who not used to such approach. Also requires jQuery library.

#3 Disabling of APEX command button using apex:facet method

In this solution we will replace the button with "Processing..." text once the user clicks the button

VF page:
DisableApexCommandButton
<!--
    Version        : 1.0
    Company        : Websolo inc. 
    Date           : 03/2015
    Description    : Disabling of APEX command button using apex:facet method
    Update History : 
-->
<apex:page sidebar="false" showheader="false" cache="false" expires="0" controller="DisableApexCommandButtonContr">

    <apex:composition template="{!$Site.Template}">
    <apex:define name="body">
    <apex:form style="width:550px;" id="f1">
        <apex:outputPanel >
            <apex:actionStatus id="status">
            <apex:facet name="stop">
                <apex:commandButton style="margin-top:20px;margin-left:250px;margin-bottom:25px;height:30px;font-size:12px;width:90px" action="{!run}" status="status" value="Generate" disabled="false" rerender="f1"/>
            </apex:facet> 
            <apex:facet name="start">
                <apex:commandButton style="margin-top:20px;margin-left:250px;margin-bottom:25px;height:30px;font-size:12px;width:90px" action="{!run}" status="status" value="Processing..." disabled="true"/>
            </apex:facet>
            </apex:actionStatus>
            <apex:selectRadio value="{!chart}">
                <apex:selectOptions value="{!items}"/>
            </apex:selectRadio><p/>
            <div>
                <apex:chart height="300" width="500" data="{!data}">
                    <apex:legend position="top"/>
                    <apex:axis title="Y" type="Numeric" position="left" grid="true" fields="valY"/>
                    <apex:axis title="X" type="Numeric" position="bottom" fields="valX" />
                    <apex:lineSeries title="{!chart}" axis="left" xField="valX" yField="valY"/>
                </apex:chart>
            </div>  
        </apex:outputPanel>
    </apex:form>
    </apex:define>
    </apex:composition>
</apex:page>

PROS: Efficient and user friendly
CONS: None