Monday, January 16, 2017

Pre-poulate the "Name" field when creating a new record and update after saving

Sometimes there is a need to not use Auto-number as a record name. Instead, you want to pre-populate a Name field when creating a new record with a default value and update the Name based on some rules.
Unfortunately, it's impossible to create your own New custom button. The only option to achieve the requirement is to override the New button with custom VF page. Further please find solution description.

#Edit a new button - override with Visualforce page


Visualforce page was created which redirects to a hack URL with parameter "Name=Partner+Plan".

<apex:page standardController="Partner_Plan__c">
  <script>
      window.top.location.href = '/a0w/e?nooverride=1&retURL=%2Fa0w%2Fo&Name=Partner+Plan';  
 </script>
</apex:page>


#To prevent multiple redirect it's necessary to add parameter "nooverride=1".

After clicking on the button "New" you will be redirected to the page with these paramerers and field "Name" will be filled.
Partner Plan Name required update after saving. It should be consists "Partner Plan" + "Partner Name" + "Year".

#This was done using Workflow Rule.
  • Rule Criteria: true;
  • Evaluation Criteria: Evaluate the rule when a record is created, and every time it's edited
  • Immediate Workflow Action: field update;
  • Formula value: "Partner Plan - " + Practice_Group_Lead__r.FirstName + " " + Practice_Group_Lead__r.LastName + " " - " + TEXT(Plan_Year__c)
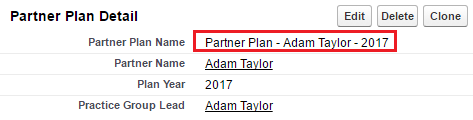
After saving:

Monday, August 22, 2016

Storage Usage issue - remove legacy and redundant Task records

Salesforce Orgs with long usage history (more than 3 years) and small Data Storage limits (~1GB) could suffer storage limit issues (> 100%).

In most cases Task object brings the issues with Data Storage overuse.

Unfortunately as per SFDC limitation there is no quick way to delete/remove Tasks created 2 years ago and backwards.

However there is a workaround using custom reports/data export and data loader. Please do not hesitate to contact us if you will need help to leverage this approach.

STEP 1: Export Data
Go to the Setup -> Data Management -> Data Export and click Export Now or Schedule Export button.


Tick Task then click Start Export.


As a result you will be able to download .zip file which contains .csv with tasks data.


STEP 2: Do clean up using Data Loader
Open as excel file and sort data by created date, leave id of tasks which needed to delete. Then use Data Loader to delete these tasks

Approach is a little bit time consuming but works.

Wednesday, July 13, 2016

Native fields in Lead mapping for conversion

For Leads conversion process Salesforce provides out-of-box functionality for mapping Lead fields to Account/Contact/Opportunity.

Unfortunately there is a limitations - you can't map native Leads fields to target object's native field. For instance you can't map value from LeadSource ("native" Lead field) to AccountSource ("native" Account field).

Here is one of the possible ways to workaround the limitation. Solution could be modified based on particular business requirements. Please do not hesitate to contact us if you want to leverage this solutions in your Saleforce instance.

STEP 1: Create custom Formula(Text) field for Lead object
Name: LeadSourceCustom
Formula:  TEXT(LeadSource)

STEP 2: Create custom Text(100) field for Account object
Name: AccountSourceCustom

STEP 3: Amend Lead fields mapping to write value from LeadSourceCustom to AccountSourceCustom.

STEP 4: Create simple Trigger on Account object
/*
    Version        : 1.0
    Company        : Websolo inc. 
    Date           : 07/2016
    Description    : 
    Update History : 
*/
trigger AccountSourceTrigger on Account (before update,before insert) {
    for(Account a: Trigger.new){
        if(a.AccountSourceCustom__c != null && a.AccountSourceCustom__c != '' && (a.AccountSource == null || a.AccountSource == '')){
            a.AccountSource = a.AccountSourceCustom__c;
        } 
    }
}

As a result this trigger will update native AccountSource field with value from "native" LeadSource field.

EXTRA NOTE:
We can't use WorkFlow as a workaround because AccountSource field is picklist and when we create workflow action to update this field we can write only specific value from the picklist.

Friday, April 1, 2016

Account Contact Roles on Contact layout

Salesforce has Contact Roles feature. Contact Role(s) could be applied for any Account and appear on Account layout as a related list. These Roles represent the role(s) that Contact(s) from the same or any other Account(s) plays in the Account. Such Roles could be also specified for Case, Contract, or Opportunity. When Contact roles defined, your team has more information to determine who to contact in particular circumstances.

Unfortunately Salesfroce does not provide any out-of-box tool to let User to see in which Account(s) the particular Contact involved. Means on Contact layout User can's see in which Account the Contact plays "Contact Role".

We want to share pretty easy solution to provide your Users such capability. Solution could be modified based on particular business requirements. Please do not hesitate to contact us if you want to leverage this solutions in your Salesforce instance.

STEP 1: Create VF page and APEX controller 

First you need to create custom Visualforce page which will display list of related to Contact Accounts and Contact Roles. Page's controller will consist of  SOQL SELECT related Account for current Contact. In our example we build Contact Roles for Account.

VF page:
ContactAccountsRolesDetails

<!-- 
Version      : 1.0
Company      : WebSolo Inc.
Date         : 03.2016
Description  : VF page "ContactAccountsRolesDetails" 
History      :             
-->
<apex:page standardController="Contact" extensions="ContactAccountsRolesDetailsContrExt" sidebar="false" showHeader="false" cache="false">
<style>
ul {
    margin-left: 0; 
    padding-left: 0;
}

li {
    list-style-type: none;
}    
</style>
    <apex:pageBlock >
        <apex:Messages />
        <apex:pageBlockTable value="{!listAccountContactRole}" var="acr" rendered="{!records}">
            <apex:column HeaderValue="Account Name">
                <!--<apex:outputText value="{!acr.Account.Name}"/>-->
                <a href="../{!acr.AccountId}" target="_parent"><apex:outputText value="{!acr.Account.Name}"/></a>
            </apex:column>
            <apex:column HeaderValue="Role">
                <apex:outputText value="{!acr.Role}"/>
            </apex:column>
            <apex:column HeaderValue="Primary">
                <apex:outputField value="{!acr.IsPrimary}"/>
            </apex:column>
        </apex:pageBlockTable>
        
    </apex:pageBlock>
</apex:page>


Controller:
ContactAccountsRolesDetailsContrExt


/*
    Version        : 1.0
    Company        : Websolo inc. 
    Date           : 03/2016
    Description    : 
    Update History : 
*/
public class ContactAccountsRolesDetailsContrExt
{ 
    public Id idContact;
    public Boolean records {get; set;}
    public List listAccountContactRole {get; set;}
    
    public ContactAccountsRolesDetailsContrExt(ApexPages.StandardController Controller) 
    {
        records = false;
        idContact = Controller.getRecord().id;
        listAccountContactRole = [SELECT id, AccountId, Account.Name, ContactId, Role, IsPrimary FROM AccountContactRole WHERE ContactId =: idContact];
        
        if (listAccountContactRole.size() != 0)
        {
            records = true;
        }
        else
        {
            Apexpages.Message noRecords = new Apexpages.Message(ApexPages.severity.INFO, 'No records to display');
            Apexpages.addMessage(noRecords);
        }
    }
}

STEP 2: Add VF page to layout

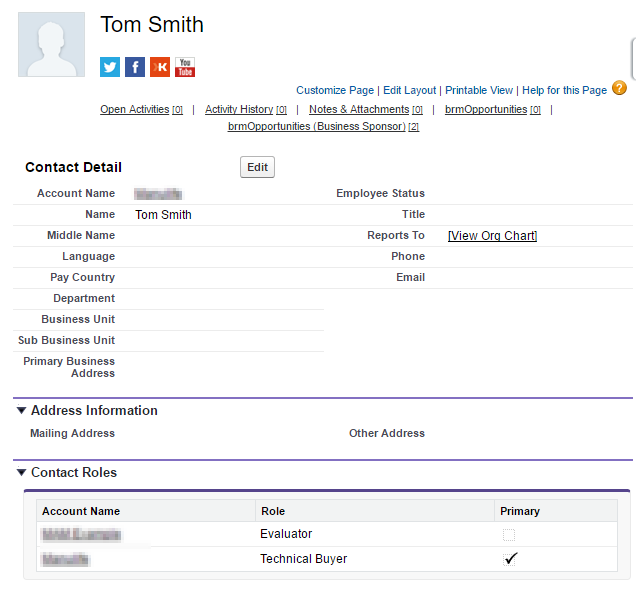
When created VF page could be added to Contact Layout as in example below.


Friday, March 4, 2016

Disable and animate APEX command button after click to avoid double submission


There is wide known scenario when click to APEX command button on custom VF page would take quite long time to perform calculation on server side and return the result back to UI. User may try to click the button again which will result in unexpected and undesired consequences. Especially if click to the button invokes DML operations.

There are a few workarounds to avoid such scenarios. In this post you will the most popular workarounds with analysis about their PROS and CONS.

Solution could be modified based on particular business requirements. Please do not hesitate to contact us if you want to leverage any of this solutions in your Salesforce instance.

Notes related to all examples below:

  • As a $Resource.statusbar you can use any .gif animated "in progress" image
  • In all demos we used external controller to build mathematic curves to simulate server activity

#1 Disabling of APEX command button using jQuery. Replacing button with animated GIF

Disabling the button once the user clicks the button could be the straight forward solution. In this solution we will replace the button once the user clicks the button using jQuery

VF page:
DisableApexCommandBut
ton to demo disable Button
<!-- 
Version      : 1.0
Company      : WebSolo Inc.
Date         : 03.2016
Description  : VF page "DisableApexCommandButton" to demo disable Button
History      :             
-->

<apex:page sidebar="false" showheader="false" cache="false" expires="0" controller="DisableApexCommandButtonContr">
    <script src="https://ajax.googleapis.com/ajax/libs/jquery/1/jquery.min.js"></script>
    <apex:composition template="{!$Site.Template}">
    <apex:define name="body">
    <apex:form style="width:550px;" id="f1">
        <apex:outputPanel >
            <apex:commandButton style="margin-top:20px;margin-left:250px;margin-bottom:25px;height:30px;font-size:12px" styleClass="b1" value="Generate" status="status" action="{!run}" rerender="f1"/>
            <div style="display: none;   margin-left: 250px;"  class="statusbardiv">
                <apex:image width="70px" url="{!$Resource.statusbar}" />
            </div>
            <apex:selectRadio value="{!chart}">
                <apex:selectOptions value="{!items}"/>
            </apex:selectRadio><p/>
            <apex:actionStatus id="status" onstart="$('.statusbardiv').css('display','block');$('.b1').css('display','none');" onstop="$('.statusbardiv').css('display','none');$('.b1').css('display','block');" />    
            <div>
                <apex:chart height="300" width="500" data="{!data}">
                    <apex:legend position="top"/>
                    <apex:axis title="Y" type="Numeric" position="left" grid="true" fields="valY"/>
                    <apex:axis title="X" type="Numeric" position="bottom" fields="valX" />
                    <apex:lineSeries title="{!chart}" axis="left" xField="valX" yField="valY"/>
                </apex:chart>
            </div>  
        </apex:outputPanel>
    </apex:form>
    </apex:define>
    </apex:composition>
</apex:page>

PROS: Easy to implement. Looks good.
CONS:  Requires jQuery library.

#2 Call custom div as an overhead "modal window"

Another solution would be not try to "disable" buttons, but to call custom modal window which will prevent user from multiple clicks and multiple form submission.

VF page: DisableApexCommandButton
<!--
    Version        : 1.0
    Company        : Websolo inc. 
    Date           : 03/2015
    Description    : Call custom div as an overhead "modal window"
    Update History : 
-->
<apex:page sidebar="false" showheader="false" cache="false" expires="0" controller="DisableApexCommandButtonContr">
    <script src="https://ajax.googleapis.com/ajax/libs/jquery/1/jquery.min.js"></script>
    <style>
    .disabledbutton {
        pointer-events: none;
        opacity: 0.4;
        background-color:#E1E1E1;
    }
    </style>
    <apex:composition template="{!$Site.Template}">
    <apex:define name="body">
    <apex:form style="width:550px;" id="f1">
        <apex:actionStatus id="status" onstart="$('#mydiv').addClass('disabledbutton');$('.statusbardiv').css('display','block');" onstop="$('#mydiv').removeclass('disabledbutton');$('.statusbardiv').css('display','none');" />
        <div style="display: none; position: fixed; z-index: 999; margin-left: 250px; margin-top: 200px"  class="statusbardiv">
            <apex:image width="70px" url="{!$Resource.statusbar2}" />
        </div>
        <div id="mydiv">
            <apex:outputPanel >
                <apex:commandButton style="margin-top:20px;margin-left:250px;margin-bottom:25px;height:30px;font-size:12px" styleClass="b1" value="Generate" status="status" action="{!run}" rerender="f1"/>
                <apex:selectRadio value="{!chart}">
                    <apex:selectOptions value="{!items}"/>
                </apex:selectRadio><p/>    
                <div>
                    <apex:chart height="300" width="500" data="{!data}">
                        <apex:legend position="top"/>
                        <apex:axis title="Y" type="Numeric" position="left" grid="true" fields="valY"/>
                        <apex:axis title="X" type="Numeric" position="bottom" fields="valX" />
                        <apex:lineSeries title="{!chart}" axis="left" xField="valX" yField="valY"/>
                    </apex:chart>
                </div>  
            </apex:outputPanel>
        </div>
    </apex:form>
    </apex:define>
    </apex:composition>
</apex:page>

PROS: Works better in some cases
CONS: Not visually perfect for some users who not used to such approach. Also requires jQuery library.

#3 Disabling of APEX command button using apex:facet method

In this solution we will replace the button with "Processing..." text once the user clicks the button

VF page:
DisableApexCommandButton
<!--
    Version        : 1.0
    Company        : Websolo inc. 
    Date           : 03/2015
    Description    : Disabling of APEX command button using apex:facet method
    Update History : 
-->
<apex:page sidebar="false" showheader="false" cache="false" expires="0" controller="DisableApexCommandButtonContr">

    <apex:composition template="{!$Site.Template}">
    <apex:define name="body">
    <apex:form style="width:550px;" id="f1">
        <apex:outputPanel >
            <apex:actionStatus id="status">
            <apex:facet name="stop">
                <apex:commandButton style="margin-top:20px;margin-left:250px;margin-bottom:25px;height:30px;font-size:12px;width:90px" action="{!run}" status="status" value="Generate" disabled="false" rerender="f1"/>
            </apex:facet> 
            <apex:facet name="start">
                <apex:commandButton style="margin-top:20px;margin-left:250px;margin-bottom:25px;height:30px;font-size:12px;width:90px" action="{!run}" status="status" value="Processing..." disabled="true"/>
            </apex:facet>
            </apex:actionStatus>
            <apex:selectRadio value="{!chart}">
                <apex:selectOptions value="{!items}"/>
            </apex:selectRadio><p/>
            <div>
                <apex:chart height="300" width="500" data="{!data}">
                    <apex:legend position="top"/>
                    <apex:axis title="Y" type="Numeric" position="left" grid="true" fields="valY"/>
                    <apex:axis title="X" type="Numeric" position="bottom" fields="valX" />
                    <apex:lineSeries title="{!chart}" axis="left" xField="valX" yField="valY"/>
                </apex:chart>
            </div>  
        </apex:outputPanel>
    </apex:form>
    </apex:define>
    </apex:composition>
</apex:page>

PROS: Efficient and user friendly
CONS: None

Sunday, December 27, 2015

Self recurring class to create test records in Salesforse object

While working on Round Robin Incidents Assignment Routine for BMC Remedyforce we've built a tool to auto create test Incident records. This tool creates new record every one minute simulating real environment.

After minor modifications the same solution could be used for similar purposes to simulate creating records in standard or custom from SFDC UI. Below we provided example of self recurring class to create test Contact records.

The code has comments however please feel free to Contact Us if you have any questions.

APEX Class: AutoContactsCreator
/*
Version      : 1.0
Company      : WebSolo inc.
Date         : 12.2015
Description  : APEX class to automatically create new test Contact record (with some test data) each 5 minutes
History      :             
*/
global class AutoContactsCreator implements Schedulable{
 //Execute method
    global void execute(SchedulableContext SC) {
        //Code to check if test Account with name 'Test Account' exists and to create one if not.
        List acc = [SELECT id FROM Account WHERE Name = 'Test Account' limit 1];
        if(acc.size() == 0){
            Account NewAcc = new Account();
            NewAcc.Name = 'Test Account';
            insert NewAcc;
            acc.add(NewAcc);
        }
        //Code to check if test Contacts (created before with name AutoContact) exist and to identify the most recent Name (to auto increase name for new one).
        Contact con = new Contact();
        con.AccountId = acc[0].id;
        //Get next number of autocontact
            //Get last AutoContact record and parce LastName value
             List lastCon = [SELECT Name FROM Contact WHERE LastName LIKE 'AutoContact%' ORDER BY CreatedDate DESC LIMIT 1];
             //If exist, substring most recent name OR start form 1
             Integer NumOfNextAutoCon;
             if(lastCon.size() != 0){
                 String nameOfLastAutoCon = lastCon[0].Name;
                 NumOfNextAutoCon = Integer.valueOf(nameOfLastAutoCon.substringAfter('AutoContact')) + 1;
             }
             else{
                NumOfNextAutoCon = 1;
             }
        //Prepare values for First/Last Name, Phone, Email     
        con.FirstName = 'Test';
        con.LastName = 'AutoContact' + NumOfNextAutoCon;
            //Generate random number for phone from 1000000 to 9999999
            Integer uniqueVal =  Math.round(Math.random()*1000000) + 999999 ;
        con.Phone = '416' + uniqueVal;
        con.Email = 'AutoContact' + NumOfNextAutoCon + '@TestAccount.com';
        insert con;
        
        //This code section will schedule next class execution in 5 minutes from now
        datetime nextScheduleTime = system.now().addMinutes(1);
        string minute = string.valueof(nextScheduleTime.minute());
        string second = string.valueof(nextScheduleTime.second ());
        string cronvalue = second+' '+minute+' * * * ?';
        string jobName = 'AutoContactsCreator ' + nextScheduleTime.format('hh:mm');
        AutoContactsCreator p = new AutoContactsCreator();
        system.schedule(jobName, cronvalue , p);
 
        //This code section to be used to abort auto-scheduled job
        system.abortJob(sc.getTriggerId());
    }
    //Method to start shedule job form console
    public void startJob(){
        datetime nextScheduleTime = system.now().addMinutes(1);
        string minute = string.valueof(nextScheduleTime.minute());
        string second = string.valueof(nextScheduleTime.second ());
        string cronvalue = second+' '+minute+' * * * ?' ;
        string jobName = 'AutoContactsCreator ' + nextScheduleTime.format('hh:mm');   
        AutoContactsCreator p = new AutoContactsCreator();
        system.schedule(jobName, cronvalue , p);    
    }
    //Method to abort shedule job (with 'AutoContactsCreator' name) form console
    public void deleteJob(){
        CronTrigger job = [SELECT Id, CronJobDetail.Id, CronJobDetail.Name, CronJobDetail.JobType FROM CronTrigger where CronJobDetail.Name LIKE 'AutoContactsCreator%'];
        system.abortJob(job.Id);
    }
 }

APEX Class: AutoContactsCreator_TESTclass
/*
Version      : 1.0
Company      : WebSolo inc.
Date         : 12.2015
Description  : APEX test coverage class for AutoContactsCreator class
History      :             
*/
@isTest
private class AutoContactsCreator_TESTclass {
    static testMethod void myUnitTest() {
        AutoContactsCreator autoCrCon = new AutoContactsCreator();
        autoCrCon.StartJob();
        autoCrCon.deleteJob();
        system.schedule('Test', '0 0 * * * ?' , autoCrCon);
    } 
}

SFDC Developer Console commands to use with AutoContactsCreator class

To execute self recurring class
AutoContactsCreator autoCrCon = new AutoContactsCreator();
autoCrCon.StartJob();

To abort self recurring class
AutoContactsCreator autoCrCon = new AutoContactsCreator();
autoCrCon.deleteJob();
Note: You also can abort the job manually here Setup -> Jobs -> Scheduled Jobs

Helpful command to DELETE all previously created by self recurring class test records
DELETE [SELECT id FROM Contact WHERE LastName LIKE 'AutoContact%'];

Monday, June 8, 2015

Custom Salesforce Round Robin Incidents Assignment Routine for BMC Remedyforce

Salesforce Round Robin Assignment Routine for BMC Remedyforce was built for companies wanting to automatically distribute and assign incoming Incidents to the Members of different Support Teams (Groups) depending on Incident creation time and Group's Time Zone.

We have multiple Assignment Routine implementations for different businesses who use BMC Remedyforce and Salesfroce. Armed with multiple extra features Round Robin Incidents Assignment Routine for BMC Remedyforce works extremely well and deserved great references.

For instance please take a look at this reference - shared by our client who we recently helped with the RemedyForce Round Robin customization:
https://communities.bmc.com/ideas/3675#comment-62436

Please do not hesitate to Contact Us if you have any questions or wish to add this extremely useful functionality to your Salesforce with Remedyforce instance. We'll happy to reply with answers, licensing options and pricing details.


Round Robin for BMC Remedyforce
Most important Functional Features:

- "Assignment Groups" Tab (Console) to manage multiple Groups of Users involved in "Round Robin" assignment routine and monitor their current indicators such as Time Zone, Assignment Score, Status, etc.
- Capability to enable/disable particular Group(s) from round robin cycle
- Capability to assign Members to Groups based on Shifts ("Assignment Time Frame" feature)
- Capability to activate/deactivate Group's Members from round robin cycle if the Member is sick or on vacation
- Potential capability for Members to "check out/check in" from/to round robin cycle ("Self Management" feature)
- Capability to set Share for each Member in the Group - as a % of the total records received from assignment Queue during the day ("Not Equal Share" feature)
- Reporting capabilities to help manager to track Round Robin Assignment statistics

Other Details:
- 100% Native SFDC Application. Means no servers or outside services required.
- Supports following Salesforce.com Editions: Enterprise, Unlimited, Developer
- Instant processing time, no assignment delays

Solution functionality could be amended and enhanced to meet additional particular business requirements. Here are few possible scenarios:
- "Day time" Group(s) to handle the normal working day Incidents and "on call" Group for off-hours support
- Assign Incidents to Group(s) designated to particular Incident Priority/Impact or any other set of custom criteria
- Auto login/logout Members from/to Round Robin cycle based on their login and log out time in Salesforce. So that they wouldn't receive Incidents if they are not actually working now.

Screens
1) Assignment Groups ConsoleAssignment Groups Console

2) Assignment Group layout
Assignment Group layout

 3) Group Member layout
Group Member layout